Last Updated on January 3, 2025
Article Contents
How to Create Animated Videos for YouTube and Beyond – Step-by-Step Guide
Creating animated videos is a highly effective way to engage audiences, whether for entertainment, education, or marketing. From YouTube channels to business presentations, animated videos allow you to tell stories, explain ideas, and capture attention in a visually appealing way. This guide will walk you through every stage of the animation creation process, from choosing software to publishing your final video. By following these steps, you’ll gain the knowledge to create professional-quality animations for any purpose.

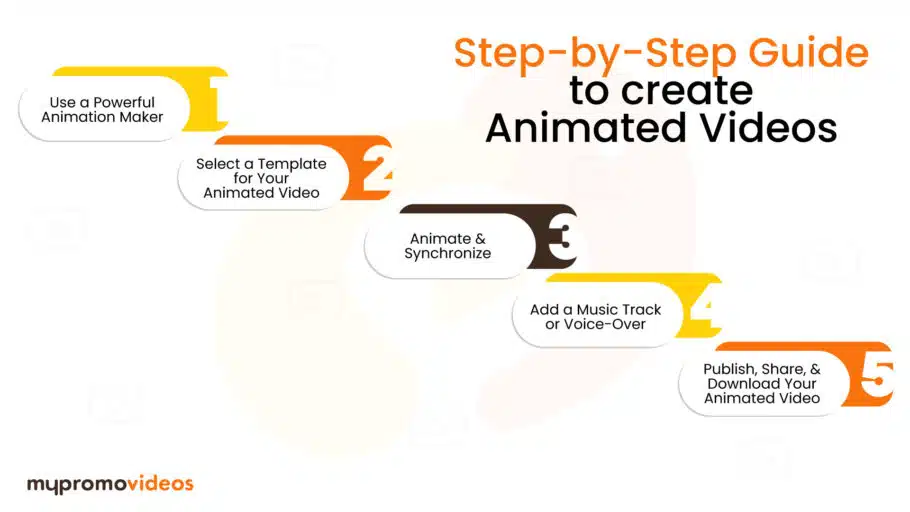
Step 1: Use a Powerful Animation Maker
The foundation of any animated video is the software you use. Choosing the right animation maker ensures you have the tools to bring your ideas to life with the quality and style you envision. A powerful animation maker can help you streamline the process, allowing you to create animations that look professional and meet your creative needs.
Choosing the Right Software
Selecting software that matches your animation goals is essential. Here’s an overview of some popular tools to consider:
- Adobe Animate: Known for its flexibility and powerful features, Adobe Animate is great for creating anything from basic 2D animations to complex cartoon sequences. It’s widely used by professionals for character-based animations.
- Blender: Blender is an open-source software that specializes in 3D animation, making it perfect for creating immersive, lifelike animations. It’s packed with features like sculpting, rendering, and simulation tools, though it requires a bit more learning if you’re a beginner.
- Animaker: A web-based tool designed for simplicity and speed, Animaker offers templates and drag-and-drop features that allow beginners to create animations without extensive technical skills. It’s particularly popular for explainer videos and social media content.
Choosing the right software depends on factors like your experience level, the type of animation (2D, 3D, cartoon), and the complexity of your project.
Key Features to Look For
When choosing animation software, it’s important to consider these features:
- User-Friendly Interface: A simple and intuitive interface makes learning animation easier, especially if you’re a beginner.
- Template Library: Templates allow you to get started quickly and provide structure to your animation projects.
- Audio Syncing: Syncing voiceovers, music, and sound effects is crucial for creating engaging, professional animations.
- Export Options: Ensure the software allows you to export in multiple formats and resolutions compatible with YouTube, websites, and social media.
Each of these features plays a role in making your animation creation smoother, quicker, and more effective.
Step 2: Select a Template for Your Animated Video
Templates are a valuable resource when creating animated videos, especially if you’re working on a tight timeline or want to streamline the process. Most animation tools offer various templates tailored to different content types and industries.
Why Templates Matter
Templates save time by providing a pre-designed structure for your video, reducing the need to start from scratch. They are particularly helpful when learning how to create an animated video for YouTube, as they help you understand common layouts, transitions, and character animations used in the industry. By providing a framework, templates allow you to focus on customization rather than building from the ground up.
Using templates also ensures your video looks polished and cohesive, which is important for brand consistency if you’re creating content for marketing purposes.
Types of Templates
Templates come in various types based on the purpose of the animation. Some popular template categories include:
- Cartoon Animation Templates: Great for content geared towards kids or lighthearted projects, cartoon templates feature bright colors, fun characters, and playful transitions.
- Explainer Video Templates: Designed to deliver information clearly, explainer templates are structured to help you introduce products, explain processes, or educate audiences in an engaging way.
- Social Media Templates: Short-form templates are optimized for platforms like Instagram and Facebook. They are usually fast-paced and include attention-grabbing animations, making them perfect for promoting brands and products.
Using templates aligned with your specific project goals helps ensure your video resonates with the intended audience.
Step 3: Animate and Synchronize
This is the step where you bring your template to life by customizing characters, backgrounds, text, and more. Animating and synchronizing are key to creating a fluid and visually captivating video.
Customize Your Characters and Scenes
Customization is what makes an animated video uniquely yours. Here are some ways to personalize your template:
- Character Design: Modify the characters’ appearance by adjusting features like hair color, outfits, and facial expressions. Some animation software even lets you design characters from scratch.
- Backgrounds and Scenes: Change the color schemes, scenery, and objects in the background to fit your brand or storytelling requirements.
- Text Elements: Adjust text for titles, subtitles, and annotations. Make sure the font, size, and color are consistent with the video’s style and are easy to read.
Adding these custom touches will make your video feel professional and aligned with your brand or content goals.
Synchronize Animation with Audio and Visual Cues
Synchronizing audio with animation is crucial for maintaining viewer engagement. Here’s how to effectively sync audio:
- Lip Syncing: If your characters speak, many animation tools offer lip-syncing features that make characters’ mouths move in time with the voiceover.
- Background Music Timing: Sync background music with transitions and scenes to create a more immersive experience. Avoid letting music overpower dialogue.
- Sound Effects: Adding subtle sound effects, like clicks, swooshes, or typing sounds, enhances the realism and helps guide the viewer’s attention.
Synchronizing audio with animation gives the video a professional touch and makes it easier for viewers to follow along.
Step 4: Add a Music Track or Voice-Over
Adding sound, whether through music or voice-over, can greatly enhance the impact of your animated video. It can set the mood, emphasize key points, and create a more engaging viewing experience.
Choosing the Right Soundtrack
The soundtrack you choose can make or break the tone of your animation. Here’s what to consider:
- Genre: Match the music genre to the mood of your animation. Upbeat tracks work well for fun content, while mellow instrumentals are better suited for serious or educational videos.
- Volume Control: Adjust the volume so the music enhances rather than distracts from the main content, especially if there’s dialogue.
Many animation tools provide access to royalty-free music libraries, allowing you to find tracks that are suitable for YouTube and other social platforms without licensing issues.
Recording a Professional Voice-Over
A high-quality explainer video voice over can clarify the story and add professionalism to your animated video. Here are some tips for recording voice-overs:
- Scripting: Write a script that matches the timing of the animation to avoid gaps or rushed segments.
- Recording Quality: Use a good microphone and record in a quiet space to ensure clear audio.
- Editing: Use audio editing software to remove background noise and adjust volume levels. Polished audio ensures the voice-over complements the visuals without overpowering them.
A professional voice-over is especially helpful for explainer videos or YouTube animations, as it adds clarity and authenticity to the content.
Step 5: Publish, Share, and Download Your Animated Video
Once your animation is complete, the final step is to export and publish it. Properly formatting and sharing your video ensures it reaches your intended audience effectively.
Export Your Video in the Right Format
Exporting correctly is essential, especially if you’re sharing on multiple platforms. Here are some common considerations:
- Resolution: Higher resolutions like 1080p are standard for YouTube, while 720p is acceptable for social media.
- File Size and Format: Compressed formats like MP4 maintain quality while reducing file size, making them suitable for YouTube and other platforms.
- Frame Rate: A frame rate of 24 to 30 frames per second (FPS) is typically ideal for animations, providing smooth motion without heavy file sizes.
Selecting the appropriate export settings ensures your video maintains quality on every platform.
Sharing on YouTube and Other Platforms
Finally, upload your video to the appropriate platform. Here’s how you can optimize sharing:
- YouTube: YouTube is the best platform for longer-form animations and tutorials. Include a clear title, description, and relevant keywords to improve searchability.
- Social Media: Short clips or teaser videos work well for Instagram, Facebook, and Twitter, generating interest and directing traffic to the full video.
- Embedding on Websites: If you’re creating an explainer or educational video, embedding it on your website enhances user experience and provides valuable information to visitors.
Publishing on various platforms helps increase your video’s reach and engagement potential.
Conclusion
Creating animated videos is a powerful way to engage audiences, whether for entertainment, education, or marketing. By following this guide, you’ve learned how to create an animated video for YouTube and beyond, with insights into software, customization, audio integration, and more. With practice and the right tools, you’ll be able to produce professional-quality animations that captivate viewers and effectively convey your message.
Ready to bring your ideas to life? Start exploring animation software and create a video that reflects your creativity and storytelling prowess.

