Last Updated on January 4, 2025
Article Contents
Convert Video to Animation: A Complete Guide
Animation has come a long way, from hand-drawn cartoons to complex 3D models. But what if you could convert live-action videos into animations without traditional animation skills? The rise of AI has made this possible, allowing anyone to turn their video footage into engaging animations quickly. Converting video into animation provides an opportunity to experiment with different animation styles for a fresh and engaging look. In this guide, you’ll learn how to convert video to animation using AI, from preparation to customization and export.
What Does Converting Video to Animation Mean?
Deciding to convert a video into animation often stems from the benefits seen in the animation vs live action movies comparison. Converting video to animation means taking live-action footage—recorded with a camera—and transforming it into an animated sequence. This can give your footage a fresh, artistic style and is especially useful for creative projects, social media content, educational videos, and marketing campaigns.
The Basics of Video-to-Animation Conversion
The process of video-to-animation conversion begins by analyzing each frame of the original footage. Using AI, each frame is then transformed with styles, filters, and visual effects to create an animated look. This can include simple line-art overlays, fully rendered 3D animations, or stylized 2D effects.
Different types of animation can be applied, depending on the look you want to achieve:
- 2D Animation: This style gives a flat, illustrated look and can mimic traditional cartoon effects. The original footage may be traced or overlaid with vector-based elements, resulting in a fun, stylized video.
- 3D Animation: For a more immersive, lifelike look, you can apply 3D effects that give depth and realism. This is especially popular in gaming and virtual reality content.
- Cartoon or Stylized Animation: Cartoon filters can turn the live-action video into a hand-drawn look, ideal for storytelling, tutorials, and social media posts.
Converting video into stop motion animation offers a distinctive way to create engaging visuals with a handcrafted aesthetic.
Why Use AI for Video-to-Animation Conversion?
AI has transformed the animation industry by streamlining processes that once took hours, if not days, to accomplish. Here’s why using AI for video-to-animation conversion is beneficial:
- Automation: AI handles the frame-by-frame conversion process, applying animation styles and effects with minimal manual effort. This automation saves time, making the process accessible for non-experts.
- Style Versatility: AI tools often come with multiple animation styles, from basic cartoon effects to complex 3D rendering. Users can preview and select styles with just a few clicks, personalizing the animation to match their creative vision.
- Enhanced Quality: Machine learning algorithms can analyze and adapt to different scenes in the footage, ensuring that details remain crisp and movements smooth, ultimately producing a polished, high-quality animated result.
Using AI makes it possible for anyone, regardless of technical skills, to transform videos into eye-catching animations.
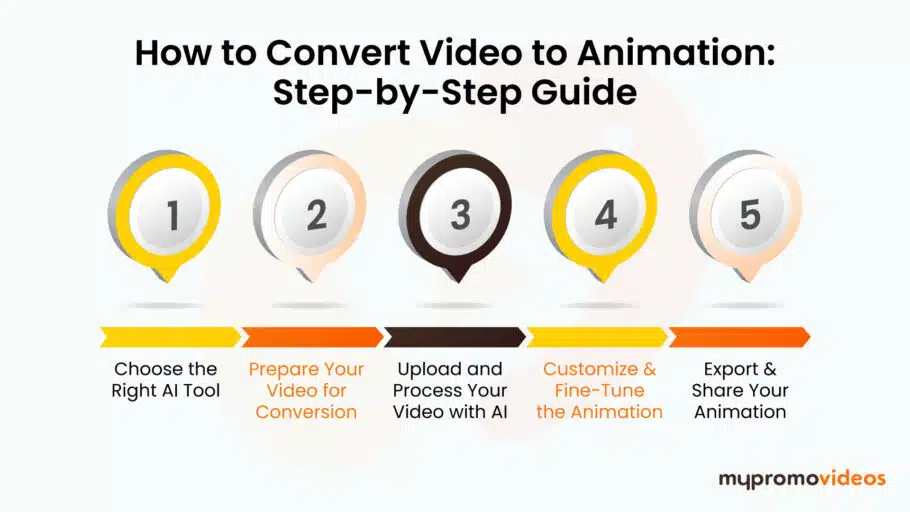
How to Convert Video to Animation: Step-by-Step Guide
Ready to start creating animations from your videos? Here’s a detailed step-by-step guide on how to convert video to animation using AI.

Step 1: Choose the Right AI Tool
The first step is to find an AI tool that best fits your project needs. Several AI-powered software programs and apps specialize in video-to-animation conversions, each offering unique features and styles. Here are a few popular options:
- Adobe After Effects with AI Plugins: Adobe’s AI plugins allow you to convert video to animation with a range of customizable settings, including various artistic styles and frame rates.
- Deep Art Effects: This app is user-friendly and offers a wide array of artistic filters and effects, making it easy to turn video clips into animated artwork.
- Runway ML: A more advanced tool, Runway ML allows you to train custom models to apply specific animation effects, making it perfect for unique and highly personalized animations.
Choose a tool based on the features, animation styles, and budget requirements. Free trials or basic versions are often available, allowing you to test the options before committing.
Step 2: Prepare Your Video for Conversion
Before uploading your video to an AI tool, make sure it’s optimized for the conversion process:
- Resolution: Higher-resolution videos produce higher-quality animations, so opt for HD if possible.
- Duration: Shorter videos are generally easier to animate and process, so consider trimming down your footage if it’s lengthy. Short, concise clips often work best.
- Visual Clarity: Videos with clear subjects and defined boundaries between foreground and background elements will yield the best results. Avoid videos with excessive motion blur or poor lighting.
By preparing your video properly, you can ensure the animation process is efficient and produces a clear, professional-looking final product.
Step 3: Upload and Process Your Video with AI
After prepping the video, upload it to your chosen AI tool. Here’s what happens during processing:
- Upload: Most platforms provide a straightforward upload process where you drag-and-drop the file or import it directly from your device.
- Select Animation Style: Once uploaded, choose the animation style or filter you want. AI tools typically offer several options, from comic book effects to painterly textures. Preview each style to see which suits your video best.
- Processing: The AI will analyze the frames in your video, apply the selected animation style, and render each frame. Processing time can vary based on video length, resolution, and animation complexity.
Step 4: Customize and Fine-Tune the Animation
AI tools offer customization options so you can adjust the animation to match your vision. Some common adjustments include:
- Color Schemes: Change the color palette to match the mood of your video or your brand colors.
- Lighting and Shadows: Add shadows or adjust lighting effects to enhance depth and realism.
- Text and Overlays: Many AI tools allow you to add animated text, logos, or other overlays to personalize your animation further.
Experiment with these settings to get the perfect look. The customization options allow you to tailor the animation to match specific project goals or branding guidelines.
Step 5: Export and Share Your Animation
Once you’re happy with the animation, it’s time to export. Here are some considerations for this final step:
- File Format: Choose a format compatible with your platform, such as MP4 for social media or GIF for website embeds.
- Resolution: Ensure the resolution matches the intended display. For example, 1080p is ideal for online video sharing, while higher resolutions may be necessary for presentations.
- Playback Speed: Some tools let you adjust the animation’s playback speed, so you can decide whether it’s displayed faster or slower than the original footage.
After exporting, you’re ready to share your animated video on social media, use it in presentations, or upload it to video-sharing platforms.
Benefits of Using AI for Video-to-Animation Conversion
Converting video to animation using AI offers several key benefits, especially for those without advanced animation skills.
Speed and Efficiency
The traditional process of creating animations from scratch can take days or even weeks, but AI automates this, allowing you to produce animated videos in a fraction of the time. The fast processing lets you meet tight deadlines, quickly producing content for fast-paced projects or campaigns.
Accessibility for Non-Experts
AI-based tools make it possible for anyone to create high-quality animations. You don’t need to learn complicated software or hire a professional animator; the tools’ intuitive interfaces and automation allow beginners to produce polished animations effortlessly.
Versatility in Creative Projects
Animated videos have a broad range of applications, from marketing campaigns to educational content. With AI, you can adapt live-action footage to fit any style or theme, adding a unique visual element that stands out. The versatility also means you can easily test different animation styles to see what works best with your audience.
Frequently Asked Questions
Can I convert any video to animation?
Most AI tools support a variety of video formats and styles, so you can convert nearly any video into animation. However, higher-quality videos with defined subjects will yield better results.
How long does it take to convert a video to animation?
Processing times vary by tool, video length, and resolution. Generally, shorter videos with simpler effects process in minutes, while complex animations or long videos may take longer.
What file formats are supported for video-to-animation conversion?
Most tools accept common formats like MP4, MOV, and AVI for input. Export options include MP4, GIF, and sometimes custom formats, depending on the platform.
Conclusion
Thanks to AI, the ability to convert video to animation is more accessible than ever. By following these steps and using the right tools, anyone can transform live-action footage into engaging animations for creative projects. Whether you’re looking to add a fresh perspective to your social media, create educational content, or simply explore new styles, AI-powered animation conversion offers endless possibilities for creativity.

